I decided a few weeks ago to post all notices of upcoming wargaming events here instead of advertising by email. It turns out the next will be sooner than I anticipated. This Sunday a couple of us are getting together in Wheaton for some board wargaming. Comment here or drop me a line and I can give you the details.
Likewise, my friend Mr Invisible and I are still planning a weeknight gaming session next Thursday. Same provisions apply.
At the same time, there are a couple of local gaming groups and shops that are worth checking out:
The Army of Central Maryland has a Yahoo group and a Facebook page.They can be found at the friendly and well-stocked Games and Stuff in Glen Burnie on most Sundays.
The Riverdale Gaming Conclave and the Non-Traditional Board Games groups can be found on Meet-up and on the Maryland side of DC.
The Washington Area DBA Gamers (WADBAG) and the DC Conscripts ASL group are still around but pretty quiet these days.
It's been a while since I talked to them, but the far side of the Potomac has the Northern Virginia Gamers (NOVAG), the Dulles Area Historical Gamers (DAHGS) and some other groups that hang out at the excellent Huzzah Hobbies in Ashburn.
And no local list would be comeplete without mentioning DC Game Night and the Games Club of Maryland or DC's own Labyrinth game store and College Parks's Board and Brew.
Thursday, December 10, 2015

Monday, December 7, 2015
The Battle of Montgomery (again...)
 |
| A portion of a 17th century map of Montgomery |
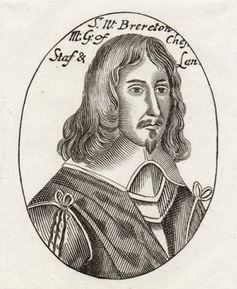
I had originally thought to continue the British Civil War (BCW) adventures of Sir William Brereton by putting on a recreation of the Battle of Hopton Heath (also discussed briefly here), but I had second thoughts. Hopton Heath is not one of the larger battles of the war (less than 3,000 combatants total), and I was afraid that I might end up with more players than commands, so I moved to a slightly larger action. I picked the 1644 Battle of Montgomery, which was much larger (over 5,000 combatants).
Alas, I chose Montgomery without knowing that not just one but two other GMs had portrayed this battle at AOCM in recent years.
Montgomery is in some ways a challenging action to make a fun game out of. For wargamers, fun battles are those where both sides feel as if they have a good chance to win. This may come from both armies having roughly comparable numbers of troops; or if the armies are unequal in numbers, the smaller side has better training or morale, or a terrain advantage, or better weapons and equipment. At Montgomery, the main difference seemed to be that the smaller side (Parliament) had some stellar leaders (Sir John Meldrum, an experienced professional Scots military officer, and my buddy Sir William Brereton, an experienced officer who had held Cheshire for Parliament) who managed to rally their force when things looked black and turn a defeat into a resounding victory.
I hoped to give Parliament the chance of creating this same event by giving their commanders, especially their CinC, Meldrum, and their infantry commander, Sir William Fairfax, top ratings. Sir William Brereton and Maj Gen Lothian also got highly rated. The Royalists under Sir John Byron got good officers, but not outstanding ones.

On the day, after some tiresome delays with getting things printed, I got to the shop and started getting set up. I briefed the Royalist players, then watched them set up while the Parliamentarian players did some shopping, then the Royalists stepped away while I briefed their opponents and they set up.
Mission
The Parliamentary forces that had been gathered to relieve the Royalist siege of Montgomery Castle consisted of about 2,000 foot, men of Yorkshire and Cheshire, along with 1,500 horse under Sir Thomas Myddleton, men from Denbigh and Cheshire. Their intent had been to chase off the Royalist army and to restore the town and castle of Montgomery to Parliament. But the Royalists had also assembled a large force (2,800 foot, 300 dragoons, 1,400 horse), considerably outnumbering Parliament's troops. So while their goal remained to defeat the enemy, Parliament's back-up plan was to fall back across the river Camladd and towards Welshpool. In order to do so, they would need to hold Salt Bridge, the one crossing point accessible to their army.
The Royalists, rather more simply, needed to attack and disperse the enemy force. Historically, Sir John Byron took the opportunity of attacking on the day that a large body of enemy horse had been sent out to forage, thus accentuating his advantage in numbers.
Troops
The Royalists deployed first, along a ridge overlooking the Camladd river, with a road (I think what is now the B4388 Welshpool-Montgomery road) running perpendicular to their front along their left flank, towards Salt Bridge.
They arrayed their infantry to the left--with dismounted dragoons screening the flank and heading towards some rough country, perfect terrain for them--and their horse on their right, massed to make a single strike force.
The Parliamentary players decided on a more traditional formation: infantry in the center, with horse on both flanks. They had another force of mounted troops off-board, the foragers under Sir William Brereton, due to return shortly after the beginning of the battle.
Terrain
West of the road and south of the river there was an area of bad ground--shrubberies, swamps, and broken terrain--which the Royalist dragoons hoped to make their own. East of the ridge along which the Royalists deployed there was an area of many small hills, but the battle never reached that area. Most of the combat took place up and down a rolling hillside, not terribly steep, and quite open. Looking at satellite imagery of the area on Google Maps and assuming that at the time it was not as enclosed as similar land might be in central England, this looks like perfect cavalry terrain.
Execution
In our battle, Sir John Meldrum and Parliament had the initiative at the outset, and they lost no time in attacking on their left with two units of horse. On the right, one unit of horse surged forward, hoping to overthrow the Royalist dragoons, which were dismounted and holding a line along the Royalist flank. In the center, the Parliament's foot held its ground.
The attacks on both flanks went poorly. The horse vs. horse action on the eastern flank was very evenly matched, but Parliament lost both of the initial encounters. On the west, the dragoons levelled and gave a devastating opening volley, putting the brakes on the enemy's cavalry charge. Parliament's cavalry on this side of the battle remained in a confused and disordered state, unable to advance and unwilling to go backwards. Once the foragers arrived, these horse had just decided to retire and turned the tricky operation of deploying a force in march column across a defile into an unfortunate traffic jam.
On the east, several squadrons of Royalist horse pursued their defeated foes far into the rear of the Parliamentary lines. More engagements went much the way of the first, with the one Parly horse unit that defeated an enemy troop quickly hit by another Royalist cavalry unit and forced to retire.
The Parliamentary foragers did return quite speedily and might have turned the tide against the King's men. Unfortunately, I had misread the historical course of events and had them enter from Parliament's rear area rather than from their left flank. As a result, the horse were held up for some time crossing over Salt Bridge and trying to deploy while the rest of Parliament's forces were being pushed back towards them.
In the center, the Royalists had taken the initiative in the foot battle, with their more numerous pike and shot pressing the Parliamentary center so hard that they took to flight. True to history, these footmen fell back toward the river and then (most of them) rallied and faced the enemy again. As in 1644, the men of Cheshire refused to be defeated.
By that point, however, the Parliamentary commanders had failed their personal morale checks and conceded the battle.
Aftermath
I think the scenario is still a viable one, but I think it needs some retouching. For one thing, the Parliament's foragers need to come on in the right place! Having three additional units of horse on the flank where the cavalry battle is taking place would make the chances that Parliament could historically defeat the Royalist horse much higher.
For another thing, deployment should probably be set, not free form. Our Parliament players split their horse between two wings, even after seeing the Royalist deployment with all its horse on one wing, and one of those Parliament wings accomplished essentially nothing in the ensuing battle, as it was left unused after its initial repulse by the Royalist dragoons.
Both sides should have a slightly higher number of officers; this is a judgement call, as there is nothing comparable to the historical unit structure to say how many officers should be represented in a C&G order of battle. But given the importance of officers in the combat and morale system of C&G, the scenario should probably represent all the major officers, not just most of them.
Finally, while chance delivered something like the remarkable rally of the Cheshire foot that took place historically, it would behoove the moderator to award the Parliament player a few "resets" of troop morale for their foot to represent what took place at the original battle. This would allow the OB to keep most of them as trained, rather than veteran troops, while giving them a chance to repeat the dogged determination of their historical forebears.
Photos
I do have some photos to add, but I didn't want to wait to post this any longer. I'll have a follow-up post with photos.
Other References
Wikipedia article on the relief of Montgomery Castle
Cromwell Association page on Montgomery
Photos of a Montgomery game using a different set of rules
Montgomery is in some ways a challenging action to make a fun game out of. For wargamers, fun battles are those where both sides feel as if they have a good chance to win. This may come from both armies having roughly comparable numbers of troops; or if the armies are unequal in numbers, the smaller side has better training or morale, or a terrain advantage, or better weapons and equipment. At Montgomery, the main difference seemed to be that the smaller side (Parliament) had some stellar leaders (Sir John Meldrum, an experienced professional Scots military officer, and my buddy Sir William Brereton, an experienced officer who had held Cheshire for Parliament) who managed to rally their force when things looked black and turn a defeat into a resounding victory.
I hoped to give Parliament the chance of creating this same event by giving their commanders, especially their CinC, Meldrum, and their infantry commander, Sir William Fairfax, top ratings. Sir William Brereton and Maj Gen Lothian also got highly rated. The Royalists under Sir John Byron got good officers, but not outstanding ones.

| Sir John Meldrum |
On the day, after some tiresome delays with getting things printed, I got to the shop and started getting set up. I briefed the Royalist players, then watched them set up while the Parliamentarian players did some shopping, then the Royalists stepped away while I briefed their opponents and they set up.
Mission
The Parliamentary forces that had been gathered to relieve the Royalist siege of Montgomery Castle consisted of about 2,000 foot, men of Yorkshire and Cheshire, along with 1,500 horse under Sir Thomas Myddleton, men from Denbigh and Cheshire. Their intent had been to chase off the Royalist army and to restore the town and castle of Montgomery to Parliament. But the Royalists had also assembled a large force (2,800 foot, 300 dragoons, 1,400 horse), considerably outnumbering Parliament's troops. So while their goal remained to defeat the enemy, Parliament's back-up plan was to fall back across the river Camladd and towards Welshpool. In order to do so, they would need to hold Salt Bridge, the one crossing point accessible to their army.
The Royalists, rather more simply, needed to attack and disperse the enemy force. Historically, Sir John Byron took the opportunity of attacking on the day that a large body of enemy horse had been sent out to forage, thus accentuating his advantage in numbers.
Troops
The Royalists deployed first, along a ridge overlooking the Camladd river, with a road (I think what is now the B4388 Welshpool-Montgomery road) running perpendicular to their front along their left flank, towards Salt Bridge.
They arrayed their infantry to the left--with dismounted dragoons screening the flank and heading towards some rough country, perfect terrain for them--and their horse on their right, massed to make a single strike force.
 |
| Sir William Brereton |
Terrain
West of the road and south of the river there was an area of bad ground--shrubberies, swamps, and broken terrain--which the Royalist dragoons hoped to make their own. East of the ridge along which the Royalists deployed there was an area of many small hills, but the battle never reached that area. Most of the combat took place up and down a rolling hillside, not terribly steep, and quite open. Looking at satellite imagery of the area on Google Maps and assuming that at the time it was not as enclosed as similar land might be in central England, this looks like perfect cavalry terrain.
Execution
In our battle, Sir John Meldrum and Parliament had the initiative at the outset, and they lost no time in attacking on their left with two units of horse. On the right, one unit of horse surged forward, hoping to overthrow the Royalist dragoons, which were dismounted and holding a line along the Royalist flank. In the center, the Parliament's foot held its ground.
The attacks on both flanks went poorly. The horse vs. horse action on the eastern flank was very evenly matched, but Parliament lost both of the initial encounters. On the west, the dragoons levelled and gave a devastating opening volley, putting the brakes on the enemy's cavalry charge. Parliament's cavalry on this side of the battle remained in a confused and disordered state, unable to advance and unwilling to go backwards. Once the foragers arrived, these horse had just decided to retire and turned the tricky operation of deploying a force in march column across a defile into an unfortunate traffic jam.
On the east, several squadrons of Royalist horse pursued their defeated foes far into the rear of the Parliamentary lines. More engagements went much the way of the first, with the one Parly horse unit that defeated an enemy troop quickly hit by another Royalist cavalry unit and forced to retire.
The Parliamentary foragers did return quite speedily and might have turned the tide against the King's men. Unfortunately, I had misread the historical course of events and had them enter from Parliament's rear area rather than from their left flank. As a result, the horse were held up for some time crossing over Salt Bridge and trying to deploy while the rest of Parliament's forces were being pushed back towards them.
In the center, the Royalists had taken the initiative in the foot battle, with their more numerous pike and shot pressing the Parliamentary center so hard that they took to flight. True to history, these footmen fell back toward the river and then (most of them) rallied and faced the enemy again. As in 1644, the men of Cheshire refused to be defeated.
By that point, however, the Parliamentary commanders had failed their personal morale checks and conceded the battle.
Aftermath
I think the scenario is still a viable one, but I think it needs some retouching. For one thing, the Parliament's foragers need to come on in the right place! Having three additional units of horse on the flank where the cavalry battle is taking place would make the chances that Parliament could historically defeat the Royalist horse much higher.
For another thing, deployment should probably be set, not free form. Our Parliament players split their horse between two wings, even after seeing the Royalist deployment with all its horse on one wing, and one of those Parliament wings accomplished essentially nothing in the ensuing battle, as it was left unused after its initial repulse by the Royalist dragoons.
Both sides should have a slightly higher number of officers; this is a judgement call, as there is nothing comparable to the historical unit structure to say how many officers should be represented in a C&G order of battle. But given the importance of officers in the combat and morale system of C&G, the scenario should probably represent all the major officers, not just most of them.
Finally, while chance delivered something like the remarkable rally of the Cheshire foot that took place historically, it would behoove the moderator to award the Parliament player a few "resets" of troop morale for their foot to represent what took place at the original battle. This would allow the OB to keep most of them as trained, rather than veteran troops, while giving them a chance to repeat the dogged determination of their historical forebears.
Photos
I do have some photos to add, but I didn't want to wait to post this any longer. I'll have a follow-up post with photos.
Other References
Wikipedia article on the relief of Montgomery Castle
Cromwell Association page on Montgomery
Photos of a Montgomery game using a different set of rules
Sunday, November 29, 2015
Quick Post on Subscribing
I should have a post on today's English Civil War miniatures game in the next day or so, but in the meantime, here's a quick PSA.
If you're trying to follow posts here, there are a number of ways to do so.
The preferred (by me) method is to "join" the page with Google Connect. That will show you as a follower of the page, so I know who the audience is. There's a widget to help you do this to the left of this post.
You can also follow by email or by RSS feed. There are links to help you do this under the Google Connect widget on the left side of the page.
If you use the Networked Blogs system, there is a link on the right-hand side of the page that will allow you to follow this blog through that service.
And below that is a "contact me" link that will allow you to write directly to me. You can use that or the post comment feature to write me directly, though the chances that I will notify you directly of future posts that way are very low. I do like getting mail, though, so I will reply if you send me messages that way.
If you're trying to follow posts here, there are a number of ways to do so.
The preferred (by me) method is to "join" the page with Google Connect. That will show you as a follower of the page, so I know who the audience is. There's a widget to help you do this to the left of this post.
You can also follow by email or by RSS feed. There are links to help you do this under the Google Connect widget on the left side of the page.
If you use the Networked Blogs system, there is a link on the right-hand side of the page that will allow you to follow this blog through that service.
And below that is a "contact me" link that will allow you to write directly to me. You can use that or the post comment feature to write me directly, though the chances that I will notify you directly of future posts that way are very low. I do like getting mail, though, so I will reply if you send me messages that way.
Wednesday, November 25, 2015
Trying Something New
 My friend Eric and I have often bewailed the fact that we find it so difficult to get together with friends for a wargame. Schedules are full, life is busy, and coordinating a group of wargamers is like herding cats (which I've done, but it takes effort!) One starts out with a long list of prospective participants, tries to find dates that will work well for the largest number, then all those unanticipated things hit (partners and family making other plans, cars breaking down, jobs calling in everyone on the weekend).
So we decided to try an experiment. First off, we're going to coordinate more with other existing local groups. It turns out that every different social media platform (Yahoo, Facebook, Googlegroups, Meetup, Boardgamegeek) has its own set of cadres, and none of them talk much with each other (or even know about each other).
Second, we're going to try meeting up once a month on a week*night* (in addition to any sort of weekend games we play). While weekend days provide more time for play, they are also frequently in great demand by family and other hobbies. Weeknights offer less time, so the scope of games has to be smaller, but that smaller timeframe also means that they're less likely to fill up with other committments.
And, third, we're going to stop aiming for the stars. Usually when we try to organize events, we're hoping for half a dozen players or more and wind up disappointed when we're only able to collect two or three (including us!) For these events, we're going to plan on just the two of us and be pleasantly surprised if more folks show up. We've both got large enough game libraries that we could play for years and never exhaust our two-player titles, but if third, fourth, and fifth players show up, we'll still have plenty of options, either for one large game or several smaller ones.
So the first date we're aiming for is Thursday, December 17th. We're looking to play GMT Games' Rebel Raiders in the High Seas, a highly rated strategic/operational game about the maritime and riverine warfare during the American Civil War. If we get more players, we may simply add another game, or we may change over to something multiplayer.
We haven't picked a location yet, but if you post a comment here to indicate you're interested, I'll be sure to get back to you with information.
I'll post an AAR afterwards, and if we continue our experiment, I'll post here so that folks can contact us if they're interested in joining in.
Monday, July 13, 2015
Philip Passes with Flying Colors
 |
| Droits de L'Homme, 74, strikes her colors. |
I picked the Audierne Bay scenario as a good one to start with, given its lower vessel count and relatively straightforward nature. Phil took Sir Edward Pellew, commanding the frigates Indefatigable and Amazon, while I commanded the French 74 Droits de l'Homme. Packed with troops and unable to open her lower gun ports because of the heavy seas, DdH was fighting effectively as a heavy 4th rate. Holding the weather gauge, Pellew brought his frigates up to windward of the French ship as she carried a large body of infantry up the Brittany coast. Indy and Amazon are both 5th rates, though Indy being a 44 counts as heavy.
We read through the rules and played ten turns in about three to three and a half hours. Although this scenario features only three ships, I think that larger numbers will not take more time in direct proportion, since larger engagements are fought primarily in formations (to allow for command and control), so fighting a squadron of ten or fifteen ships will be more like maneuvering two or three multi-part elements than moving fifteen different ships.
My comments:
Though the French were able to concentrate considerable fire on the Amazon, cutting her rigging to shreds, the plucky 36 gave as good as she got, and the French ship of the line slowed considerably, her hull battered and blood streaming from her scuppers. Thinking she had at least temporarily immobilized the Amazon, DdH ran up the wind to engage the Indy (though the fight was bringing the whole group closer to shoal water along a lee shore).
But Indy dealt the French ship several shrewd blows, and the Amazon caught the wind and got enough speed to rejoin the fight in time to slam a broadside into the stern of the Frenchman, raking her decks cruelly and doing enough damage that the DdH finally struck her colors.
 |
| Fight of the Droits de l'Homme by Léopold Le Guen |
I was advised by a friend who also frequently war-games not to discuss what I had intended to do, or was planning as it might give others the key to beating me in the future. Since winning is not my over-all goal, but rather a more in-depth understanding of historical, martial decision-making I do wish to talk about how I went about this scenario.
My two frigates began running before the wind in line-abreast. As I had the weather-gage I had sought to maintain it for as long as possible. Additionally, I wanted to get into line-ahead. I turned to port (read larboard) into line-ahead with the Amazon in the van. Since I went from running to reaching I lost no speed.
After a series of turns on both sides, I broke from line-ahead and sent Amazon (running) to cross DdH's stern while Indefatigable continued on her base course with the hopes of taking DdH between two fires. I miscalculated here as I had forgotten that in Flying Colors, a ship of the line is able to turn as quickly as a frigate. And so DdH, after taking Amazon's raking broadside and returning her own, was able to come about and send a broadside with her port battery.
This left Amazon with substantial rigging damage and afire. Indefatigable at this point was on the other side of DdH and only able to play at long-bowls and so I had left her out of position to bring her heavier guns in close. Here I made another error. Even though Indefatigable's guns were having a gradual effect on DdH's firepower, in my over-concern for the Amazon I lost awareness of the wind.
 |
| View of the Wreck of the French Ship Droits de l'Homme by John Fairburn |
I took some lessons from this:
I gave up strength of formation for an easy, but unsupported stern rake. Had I kept to line ahead, I could have forced DdH to accept two broadsides while I took only one.
Giving up the weather-gage may have had to happen at some point, but losing awareness of the direction of the wind nearly cost me a frigate.
Thursday, June 18, 2015
Waterloo's 200th: The Great Day
So, on the 18th of June itself, I have little time, sadly, to blog. I hope that tomorrow I may be able to provide something more of interest relating to the last great battle of the Napoleonic Wars.
Instead, let me point you to a couple of other sites that have interesting posts on Waterloo.
One of these I've linked to in my other Waterloo posts: JJ's Wargames.
Today, instead of providing the sort of detailed summary of the day's events he has done other days this week, he goes on a personal excursus, explaining how he came to be interested in Napeoleonic history. This caused him to travel, not only to Belgium, but to the Iberian battlefields of the Peninsular campaigns. He provides some photos and some telling insights about the ways that Wellington's journeyman battles as army commander led to his masterwork at Waterloo.
The Two Nerdy History Girls blog is another I enjoy, and today they have a piece on the Waterloo experience of Colonel Frederick Ponsonby. Those who have seen Bondarchuk's classic film about the battle, which features a scene of Col. Ponsonby leading the charge of the Union Brigade, may be surprised by the ending of his story.
Earlier in the week, the Girls also posted on the rather horrific aftermath of the battle, featuring JMW Turner's 181 painting The Field of Waterloo.
Historynet had quite a fascinating article several years ago on the women who took part in, or were at least involved in, the battle.
Which I came across when trying to rediscover a link to this article, a piece by the Smithsonian on a prominent American who took a leading role in the British Army's contingent on the field.
What round-up would be complete without links to the 200th anniversary renactment (which promises live streaming video of the event--though it appears one needs to pay a fee for it)
And, perhaps more useful, the (UK) National Army Museum's Waterloo 200 site. (The website for Les Invalides, strangely enough, doesn't even mention this week's events. Their calendar for this week has only an event about Churchill and De Gaulle. Their permanent collection features Napoleonic material in its page on the Modern Department and, of course, the Emperor's tomb, but that's all.)
And I'll close with a link for further reading, if you'd like some: the napoleon-series.org page on Waterloo, with a variety of different articles, including orders of battle, analyses, accounts of singluar incidents, and a transcription of a letter about the battle by no less than Michel Ney.
Instead, let me point you to a couple of other sites that have interesting posts on Waterloo.
One of these I've linked to in my other Waterloo posts: JJ's Wargames.
Today, instead of providing the sort of detailed summary of the day's events he has done other days this week, he goes on a personal excursus, explaining how he came to be interested in Napeoleonic history. This caused him to travel, not only to Belgium, but to the Iberian battlefields of the Peninsular campaigns. He provides some photos and some telling insights about the ways that Wellington's journeyman battles as army commander led to his masterwork at Waterloo.
The Two Nerdy History Girls blog is another I enjoy, and today they have a piece on the Waterloo experience of Colonel Frederick Ponsonby. Those who have seen Bondarchuk's classic film about the battle, which features a scene of Col. Ponsonby leading the charge of the Union Brigade, may be surprised by the ending of his story.
Earlier in the week, the Girls also posted on the rather horrific aftermath of the battle, featuring JMW Turner's 181 painting The Field of Waterloo.
Historynet had quite a fascinating article several years ago on the women who took part in, or were at least involved in, the battle.
Which I came across when trying to rediscover a link to this article, a piece by the Smithsonian on a prominent American who took a leading role in the British Army's contingent on the field.
What round-up would be complete without links to the 200th anniversary renactment (which promises live streaming video of the event--though it appears one needs to pay a fee for it)
And, perhaps more useful, the (UK) National Army Museum's Waterloo 200 site. (The website for Les Invalides, strangely enough, doesn't even mention this week's events. Their calendar for this week has only an event about Churchill and De Gaulle. Their permanent collection features Napoleonic material in its page on the Modern Department and, of course, the Emperor's tomb, but that's all.)
And I'll close with a link for further reading, if you'd like some: the napoleon-series.org page on Waterloo, with a variety of different articles, including orders of battle, analyses, accounts of singluar incidents, and a transcription of a letter about the battle by no less than Michel Ney.
Wednesday, June 17, 2015
Waterloo's 200th: Two Battles and a Retreat
 |
| The games that started it all: SPI's NLB Quad, |
I'd continue to summarize the historic action, but I don't think I could improve on the excellent posts at JJ's Wargames (here are his posts on the initial contacts of the campaign, the first battles, and the Allied retreat).
Instead I'll continue my catalog of the treatments this campaign has received in the wargaming realm. In my last post, I mentioned The Emperor Returns, Kevin Zucker's game on the campaign published by Clash of Arms Games. Of course, the name Kevin Zucker translates into the common tongue as "obsessed with the Napoleonic Wars", so it's no surprise that this was neither his first nor his last game about the Hundred Days.
 |
| Zucker's mini-game of 1815. |
A few years later, Zucker and two other authors created Hundred Days Battles. This 1979 game The Emperor Returns in 1986. I used to have a copy of Hundred Days Battles, though I forget if I played it other than solitaire.
(republished in 1983) was a smaller treatment of the same subject, beginning the use of some of his systems seen in larger form in
In 1998, Zucker came back to Belgium with The Last Days of the Grand Armée. While TER and HDB are both in the 1x (or each turn = one day) family of Zucker's Napoleonic titles, LDGA is in the "Days" series, in which turns are six hours. I've played LDGA only once so far, a learning game with a friend in which the French were ruthlessly pounded. But, playing the Allies, I had the advantage of having played the system before (The Seven Days of 1809), so I don't think this was a representative run-through. Luckily, my friends are intrigued by the series, so I think we'll be playing these and other games in the series again before too long.
 |
| SPI's prequel to WV. |
Zucker is not alone in addressing the battles of the campaign, of course. Of the two great battles of June 16th, Quatre Bras has received more attention, at least in the boardgame world. I count at least eight other Quatre Bras games in addition to that in SPI's quadrigame. Of these I have three: Battles of Waterloo by the prolific and irascible Richard Berg, which includes a Quatre Bras engagement; Ney vs. Wellington, Joseph Balkoski's chip off Frank Davis's Wellington's Victory system, making the smaller battle a good taster for the WV system; and the visually unbeatable La Bataille des Quatre Bras by Ed Wimble.
 |
| A detail of the gorgeous LBdQB. |
But what of the other battle of the day, widely billed as Napoleon's last triumph? Ligny seems to get short shrift compared with Quatre Bras, perhaps reflecting the fascination of English-speakers (long the dominant segment of the wargame design community) with "the English battle" at the crossroads. Though an Anglophile, I've grown fond of the Prussians in the context of the Napoleonic Wars, and I find it sad that while QB gets nearly a dozen titles, Ligny subsists on only four.
 |
| Would Ligny get more games if Wellington had spoken German? |
Subscribe to:
Posts (Atom)