Background image is Les Dernières Cartouches (The Last Cartridges) by Alphonse de Neuville

Friday, July 8, 2016

Catching Up: Early Summer 2016

While work has been busy, keeping me from doing as much blogging as I would like to do, I have also had the opportunity over the last couple of months to squeeze in a bit of wargaming here and there.

For one thing, I was able for once to get out to a meeting of our local ASL club, the DC Conscripts. I played two scenarios, WO3--Counterattack at Carentan and the venerable scenario 11--Defiance on Hill 30. I lost both, the first to Jason Sadler and the second to David Garvin, but enjoyed both games.

My Germans in their futile attack on Garvin's paratroopers.
Second, I met up with a group of gamers in Falls Church who meet somewhat regularly to play board wargames. I've now played four sessions with them. In one I finally got to play GMT's Virgin Queen, an excellent but highly complex game of European great-power politics in the 16th century. As the Ottoman Empire, I was able to rid the Mediterranean Sea of the Spanish scourge and establish my rule over almost all of the North African coast, as well as roust the Knights of Malta from their island stronghold. I came in third out of six blocs, which against some brainy opponents made me feel good.

Having thrashed the Spanish, the Ottoman navy book in for a minibreak at the Knights of Malta B&B.
In two other outings with the group I've had a chance to play GMT's new COIN game, Falling Sky, about the politics and warfare among the Romans and the Gallic states of the 1st century BCE. In the first playing I drew the Arverni, the central Gallic faction, against the two game designers, one playing the Romans and the other their Aedui allies. with a fourth player in charge of the Belgi, the warlike northern Gauls. I acquitted myself adequately there, with a drawn game when we stopped. On the next occasion I got the Belgi and was able to come close to winning when we had to stop the game for lack of time.

Our German cousins (black) regroup, but the Belgi (gold) have reclaimed all their territory.
And most recently I brought Wellington and was randomly selected to command the Iron Duke. I completed the siege of Ciudad Rodrigo in record time, recaptured Salamanca, and was able to draw Marshal Soult off from his siege of Cadiz, but he and Wellington fought to a standstill and we had to call the game before any decisive result was achieved.

My canny French opponents Adrian (Joseph, left) and Roberto (Soult, right) plot and plan.
 UPDATE: Here's a blog post by our host on recent boardgaming.

I've also managed to get in a couple of miniatures game. A couple of weeks ago several of us played two American Revolution scenarios using the new edition of Sharp Practice from the Too Fat Lardies. I'll put up some photos and comments in a future post, but my short review is that I was disappointed in the rules. They seem to have gone in just about the opposite direction I was hoping--instead of clarifying and streamlining the first edition rules, they're no clearer and have added layers of complication that (in my opinion) add nothing to the game. Instead of becoming more like a historical wargame covering small-unit actions (a field woefully bare in horse-and-musket era gaming), they've become more generic and game-y.

M&T: Mohawk warriors move forward in an attack on a French outpost.
I also played two scenarios of Muskets & Tomahawks recently. In like manner, I'll try to add a post with photos and commentary from our games soon. The game rules are much more clearly written than Sharp Practice, but I didn't find the games terribly compelling. Units are very small and combat results are therefore highly variable; a single round of shooting from one unit on another can be completely ineffective of completely catastrophic. Like Sharp Practice, the game feels more like watching a Hollywood movie than watching a historical battle unfold.

Wednesday, May 11, 2016

Project 1777: Addendum concerning orders of battle.

"So, what does that mean, again?" (siftingthepast.com)
Some folks have asked about my system of notation on orders of battle.

The larger number next to a unit is its historical strength, or my best approximation of it. The number in brackets is the number of stands used in the game to represent it.

Additionally, I should perhaps explain "wings". Because units, especially British units, often used very wide spacing between files, large units became hard for a commander to maneuver easily. So units over about 300 or 400 men were often broken into two subunits or wings that operated as separate units. Thus, for instance, the Queens Rangers at Short Hills are a 400-man battalion represented on the tabletop by two 4-stand wings.

As far as troops go, most will have muskets of some quality. I'm relying on research in historic records that a friend of mine did many years ago to determine which American units are likely to have been provided with bayonets.

Only a few units on the American side, and on the British side the German jaegers and a few units of Provincials carried rifles throughout. There isn't any way in C&G, currently, to reflect the practice of arming one company of a battalion, or one platoon of a company, with rifles, as the Crown Forces often did, other than treating that body as a separate unit. That's more the province of a lower-echelon game, where individual platoons are the maneuver units.

I'll add commander ratings later on, after I've had time to do a little more research and evaluation.  But at the higher level my read is that Cornwallis and Greene were some of the best general officers who served during the war, both in terms of tactical insight, organizational skill, and their ability to inspire and motivate their men. Alexander was undeniably brave, but a bit foolhardy. Grant was well-connected (a good friend of Howe's and with experience of and friends in British political circles) but alternated between rash boldness and overconfident torpor.

Carl von Donop (Wikipedia)
Von Donop sounds to have been a bit of a martinet, but generally a capable commander; he had good instincts for arranging his posts in New Jersey that were overridden by Howe, and he conducted his withdrawal in the face of the American surprise attack capably and without rush or fuss. His attack on and death at Red Bank seems to have been due more to bad intelligence about the fort and its defenders than anything else.

Benjamin Lincoln is a challenge to rate: he had a largely undistinguished and unsuccessful career as a general officer, being alternately commander of a rear guard that was not hard pressed, commander of reserves that saw no action, surprised and chased out of his billet in his nightshirt, wounded in a pointless skirmish, superintendent of a failed capaign hamstrung by poor troops and lukewarm civilian support, forced into the most humiliating surrender of American forces during the war, and then unsuccessful in his first combat command after returning to the army. On the other hand, Washington seems to have thought fairly highly of him. He recommended Lincoln for a general's commission despite his lack of experience. And he continued to put him in positions of command after repeated reverses. My guess, after a quick read, is that he was an able administrator and competent, if not distinguished, field commander who was simply cursed with some of the worst luck going.

Peter Muhlenberg seems to have been a competent, somewhat inspirational officer. George Weedon sounds as if he were very competent (or connected) given how regularly he was promoted and then tipped for adjutant general, but also hot-headed (given his leaving the service over the question of his senority). Washington seems to have blown hot and cold on him, praising him in 1777 and then many years later damning him with faint praise and implying he was a drinker. My historian friend remarks "I see Weedon and Muhlenberg as fine administrators and solid battlefield commanders (not thrilling but reliable).  Weedon had more fire in his belly early in the war.  Both inspired their men with great confidence."

Saturday, April 30, 2016

Project 1777: the Battle of Short Hills

Apologies, faithful readers! Life has kept me busy with family matters and projects at work that have eaten up my time and energy. Weekend time to devote to work on Project 1777 has been sparse. I still mean to get a playing or two of some of these early skirmishes under my belt, both to re-familiarize myself and some of my comrades with the game system and to test out some of my ratings for the units involved.

Until I can make that happen, though, I have another battle synopsis to share with you. This engagement, though still a bit one-sided historically, could be touched up to make an interesting game a little more easily than Bound Brook.
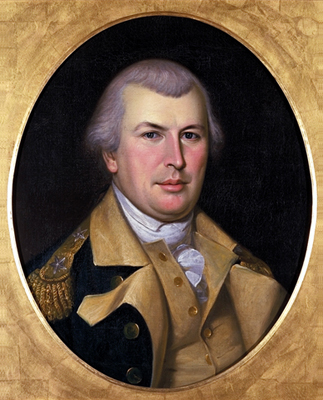
Nathanael Greene (Wikipedia)
Back to 1777

When we last left General Sir William Howe, his ploy to draw the American Army into a trap at their forward post of Bound Brook had failed. Lt. Gen. Lord Cornwallis had surrounded and attacked the American post, chasing off Maj. Gen. Benjamin Lincoln in his nightshirt (possibly even without that!) and capturing several cannon. But the Americans' nearest supports, Maj. Gen. Nathanael Greene's division, had not arrived to reinforce Lincoln until after the British forces had left. Greene harassed the rearguard of the retreating British, then ensconced himself in Bound Brook.

However, after Greene had waited several weeks to see what else might develop, Lt. Gen. George Washington had pulled Greene's division back, leaving Bound Brook to lie in the debatable zone between the two armies. Bound Brook was too far from the main American position at Morristown to be supported adequately; it was too vulnerable to sudden attack to be a suitable forward base.

Nevertheless, Washington gave Howe some room to hope that the rebel commander could still be drawn out of his fastness in the Watchung Mountains. On May 28th, two days after Greene was recalled from Bound Brook, the American army moved from its winter camp at Morristown to Middlebrook, still in the mountains but closer to the British advanced base at (New) Brunswick.

A Cunning Plan...Foiled

In June, Howe feinted, trying again to bring the Americans down out of the mountains and onto the plains of New Jersey where he hoped to defeat them in detail. Attempting to convince the Americans that he was marching toward the Delaware River and Philadelphia, the American capitol, Howe moved the main British army out of New York into New Jersey and settled for several days at Somerset Court House, south of Brunswick. But spies had told the Americans that the British bridging train, without which they could not cross the Delaware River, had remained in New York. Other supplies had also been left behind, meaning that the British could not stay in the field for long.Washington did not bite on Howe's proffered bait.

William Alexander, Lord Stirling (Hidden New Jersey)
Instead, Washington waited, and when Howe began moving back towards New York, the Americans came down from the mountains into the foothills, shadowing the King's army as it moved back to its base and picking off any stragglers who fell behind on the march. With his main army at the delightfully named Quibbletown, Washington sent an advanced guard under Maj. Gen. William Alexander to harass the British rearguard, much as Greene had chivvied Cornwallis's men after Bound Brook.

Alexander, sometimes known as Lord Stirling because he claimed to have inherited that Scottish title, had a reputation for bravery forged at the battle of Long Island the previous summer. Holding the right of the American line in that battle, Stirling had eventually been surrounded and his command forced to flee or surrender. His force had taken heavy losses, but through its sacrifice it had prevented the encirclement and capture of the entire American army. Alexander was later exchanged for Monfort Browne, the Governor of the Bahamas, who had been captured during an American raid on the islands in March of 1776. After returning to the army, Alexander commanded a brigade under Greene in the winter 1776/1777 campaign, leading the center of the American line at the battle of Trenton.

Now he sought to inflict some losses on the British rear guard as their army retreated to Perth Amboy, from there presumably to return to New York.

Barking at the Heels of the British Army

Howe determined to deal a sharp blow to Alexander's force and, as always, hoped that in the process he could draw the American field army into a decisive battle. Cornwallis, Howe's most aggressive general officer, received command of a strike force designed for speed and power. Cornwallis set off an hour after midnight with a task force of light dragoons, mounted and foot jaegers, the Queen's Rangers, a unit of Guards, and battalions of British and German grenadiers. Howe and Maj. Gen. John Vaughn followed with more jaegers, more British grenadiers, and a force of British light infantry.

A Hessian officer's map of the battle of Short Hills (Wikipedia)
As shown in the map drawn by Friedrich von Wangenheim, a Hessian mounted jaeger officer, Cornwallis' force and that under Howe advanced on parallel road, hunting for Alexander's division. Cornwallis made contact first, his jaegers coming into contact with American riflemen of Morgan's Corps just after dawn. The riflemen fought hard, not falling back until charged with the bayonet. As they were pressed, the riflemen fell back on Ottendorf's Corps, an independent light infantry force commanded by Lt. Col. Charles Armand Tuffin in the absence of its titular leader, and a body of New Jersey infantry--either militia or Continentals from Brig. Gen. William Maxwell's brigade--backed up by several artillery pieces. These supports helped stiffen the riflemen's resistance, but as more troops were deployed from the British column to the attack, the Americans were forced further back.

A Bitter Fight

Charles Armand Tuffin, Marquis de la Rouerie (Wikipedia)
Alexander had selected a defensive position on a ridge running perpendicular to the road. There he placed the main strength of his force, the remainder of Maxwell's brigade and a brigade of Pennsylvanians under Brig. Gen. Thomas Conway. Cornwallis tried to outflank this position by sending a battalion of Hessian grenadiers in a wide sweep around the Americans' left flank, but this was stalled by a battery of four French artillery pieces, carefully concealed in enfilade on a wooded hillside. One Guards officer foolishly attempted to capture the battery single-handed and was shot down at Alexander's direction. But a force of less than 2,000 men, even possessed of good defensive terrain, cannot hold against nearly 4,000 indefinitely. Eventually the pressure of the British attack forced Alexander's troops backwards, through the town of Westfield and over another line of wooded hills to the edge of the Watchung Mountains. The British, exhausted by nearly six solid hours of fighting, set to plundering Westfield. Joined by Howe's column, the expedition camped in area around the town that night and then marched back towards Staten Island the next day by way of Rahway.

Howe had again failed to draw out Washington's army, and he had missed even the prize of surrounding and capturing Alexander's division, though the British did take three of Alexander's four French guns back to New York with them. One amateur historian alleges that Washington heard the initial gunfire between the jaegers and Morgan's riflemen ten or fifteen miles away in Quibbletown and that the terrified commander immediately ordered his main army to begin fleeing back into the Newark Mountains.This seems unlikely, as does the claim that Alexander's fight at Short Hills was a brilliant strategic victory, allowing the main army time to escape a British trap. The trap had been set for Alexander, who did deftly avoid it, but Howe had not expected, when he set out in the dead of night, to encircle the American main army, only its somewhat dangerously advanced guard. One account even goes so far as to suggest that Alexander deliberately ignored an order from Washington to fall back from contact with the British main force; if that is true, Alexander was lucky to keep his command, escape or no.

A Tentative Order of Battle

My preliminary order of battle for this engagement (drawn from returns and assuming that Howe's column proves, as it did historically, to be too far away to support Cornwallis) looks something like this, much smaller than some of the fanciful and inflated numbers of some modern accounts. (Note: The larger number next to a unit is its historical strength, or my best approximation of it. The number in brackets is the number of stands used in the game to represent it: four-figure stands for infantry, two-figure stands for cavalry.)

Major General William Alexander, Lord Stirling (1,800 of all arms)

Lieutenant Colonel Charles Armand Tuffin
Ottendorf's Independent Corps (100 [2]): Line, Trained, Poor, Average
Morgan's Provisional Rifle Corps, detachment (100 [2]): Elite, Crack, Average, Excellent

Brigadier General William Maxwell
1st & 2nd New Jersey Continentals (300 [4]): Line, Trained, Average, Average
3rd & 4th New Jersey Continentals (300 [4]): Line, Trained, Average, Average
Spencer's Additional Continental Regiment (200 [3]): Line, Trained, Poor, Average
New Jersey state artillery (two sections of two four-pounders, 100): Line, Trained, Average, Average

Brigadier General Thomas Conway
3rd & 6th Pennsylvania Continentals (300 [4]): Line, Trained, Poor, Average
9th & 12th Pennsylvania Continentals (300 [4]): Line, Trained, Poor, Average
Pennsylvania state artillery (two sections of two four-pounders, 100) Line, Trained, Average, Average

Lieutenant General Charles, Lord Cornwallis (3,600 of all arms)

Captain James Weymss
Queen's Rangers (400 in two wings of [4] each): Line, Veteran, Average, Good
Ferguson's Rifle Corps (120 [2]): Line, Trained, Average, Excellent
16th Light Dragoons (300 in three squadrons of [1] each): Line, Veteran, Average, Poor 
Royal Artillery (two sections of two six-pounder guns, 100): Elite, Veteran, Average, Good

Brigadier General Carl von Donop
Hesse-Kassel Feld Jaeger Korps, foot companies (100 [2]): Elite, Crack, Good, Excellent
Hesse-Kassel Feld Jaeger Korps, mounted company (80 [1]): Elite, Crack, Good, Excellent
Linsing Grenadier Battalion (430[5]): Elite, Veteran, Good, Poor
Minningerode Grenadier Battalion (430[5]): Elite, Veteran, Good, Poor
Lengerke Grenadier Battalion (440[5]): Elite, Veteran, Good, Poor
Hessian artillery (three sections of two four-pounder guns, 150): Line, Veteran, Average, Good

Lieutenant Colonel Sir George Osborn
1st Foot Guard Battalion (450 in two wings of [5]): Elite, Veteran, Good, Average
2nd Grenadier Battalion (500 in two wings of [5]): Elite, Crack, Good, Average
Royal Artillery (two sections of two three-pounder guns, 100): Elite, Veteran, Average, Good

Thursday, March 31, 2016

Another Quick Update


Sharp Practice 2 game in progress (Diary of a Wargames Butterfly)

Just another quickie post because I ran across a cache of blogging on the new version of Sharp Practice forthcoming soon from the Too Fat Lardies.

Diary of a Wargames Butterfly has a number of articles on the new edition. The author, Mike Hobbs, is working on a campaign book abou the War of 1812 to go with the new edition of SP. He also got to play and watch a couple of games with Rich "Fondler" Clarke himelf and the crew at TFL headquarters.

Mike is also the co-host of Meeples and Miniatures, the gaming podcast, and he and his co-hosts Mike Whitaker and Neil Shuck recently interviewed Mr Clarke on M&M about Sharp Practice 2.


Wednesday, March 23, 2016

Filling in the Corners

Much of my gaming lately has been Euro gaming, rather than miniature or board wargames of a military sort, but I did get to attend a portion of Cold Wars this year, so I have some photos of that and a game report to share. Plus I have some fruits of my research labours that have almost ripened that I should be posting soon, as we begin the Philadelphia Campaign of 1777.

But I need to download some photos to go with the game report, and pull together the threads of research to ready the 1777 posts, so this is more by way of a filler until I can put those devices before you, gentle readers.

Hessian grenadiers crossing a stream with jaegers covering them. (Too Fat Lardies)

I thought I should mention that the Too Fat Lardies are e'en now readying the second edition of everyone's favourite horse & musket skirmish game, Sharp Practice. We've been given a look at the cover and a peek inside at the layout. They've introduced us to the new force-building system, and shown us a sample learning scenario set in the American Revolution. But most interestingly, they've posted twoplay-throughs of (semi) historical scenarios, one of the attack on the fenceline at Bunker Hill and, most aptly for my coming 1777 campaign, a scenario based on the skirmish at Bound Brook (to which they add a superfluous S). Overall, it looks as if the game has been evolving in a wobbly but steady path from its roots in IABSM to the first edition of SP to Through the Mud and the Blood to Chain of Command and now on to the second edition of Sharp, dropping some elements (blinds have been banished, cards have been replaced--optionally--with chits, and the rather clumsy special event system replaced with something a little more streamlined) and adding new ones (Deployment Points, a cousin of COC's Jump-Off Points).

The geography of Bounds Brook is not quite the same as that of the historic Bound Brook, and while the Lardies have added Americans ( as I do in my hypothetical treatment of the action) to bring the sides a little more in alignment, they've also hugely chopped down the British forces, so the two sides end up being more or less equal (that "balanced" battle so beloved of wargamers that appears so rarely in actual military history).

American Revolution militia (Tarleton's Quarter)
They have some photos of very nicely painted troops, but of course the past master of handsomely painted Rev War soldiers is Giles Allison of the Tarleton's Quarter blog. And since a LOT of the troops we'll be seeing in the 1777 campaign are American militia, here's a link to Giles's past posts on those American volunteer infantry (ten posts in all, with some handsome work done).

And for good measure, here are his posts on artillery: French, British, and American guns and gun crews as well as some carts and wagons. Beautiful work, and well worth a look!

Thursday, February 25, 2016

1866: Koniggratz

Austrian infantry, advancing confidently.
Last weekend I got the opportunity to participate in a test of a new presentation of the battle of Koniggratz that Bruce Weigle will be taking across the ocean to run at a game convention in Germany, to commemorate the 100th anniversary of the battle. The game used the new fast-play version of Bruce's 1866 rules and altered some of the conditions of his published scenario for the battle with the intent of making it a bit more challenging for the Prussian army.

Historically, the Prussian First Army attacked the Austrian Northern Army, which held a strong defensive position on the commanding heights above the town of Sadowa, west of Koniggratz. Prussian troops of the II and III Corps, advancing across open ground in the face of highly skilled and well equipped Austrian artillery batteries, took heavy losses. Only by drawing other Austrian troops piecemeal into a woods battle in the Swiepwald were Prussian forces of the IV Corps able to bleed FZM Benedek's forces enough that by the time the Prussian Second Army arrived to the north of the Austrians was it able to deal a crushing blow to the Kaiserlich und Koniglich forces.

Prussian line infantry blazing away at Koniggratz.
Bruce had modified the scenario to slow the arrival of the life-saving Second Army (historically, the Prussians on the field before that force arrived were on the ropes and the Austrians were considering a counterattack that could have smashed the Prussian's hopes for a conclusive victory). But most importantly, he gave the Austrians much more leeway in how to employ their forces, keeping them from being bled to death by a battle of attrition in the north and center and allowing them to pull troops from their southern reserves to repel the IV Corps and Second Army attacks.

Prussian jaegers also letting the Austrians have what for.
So in our game, the Prussian Guard and VI Corps, instead of driving through already worn-out Austrian forces like a hailstorm through a field of hay, ran headlong into a solid wall of Austrian troops, many of them holding entrenchments. Meanwhile the Austrian army's reserve artillery had created such a gun line along the plateau to the south that the Prussian II and III Corps, after clearing the forward line of towns on the Bistritz River, had been unable to concentrate their own guns to provide cover for an attack and simply sat and watched the Austrian left and center.

As commander of the Prussian III Corps, I was frustrated at my inability to help our northern forces by putting more pressure on the Austrians. As a player, I enjoyed the game a good deal. I like Bruce's whole suite of 19th century rules very much, and while I like the greater complexity of the slow-play original rules, I appreciate how hard it would be to stage the replay of a battle of this size without simplifying the game mechanics.

Prussians overrunning an Austrian battery. Wish I could have done this!
Following the game, there has been some serious discussion of the scenario among the players and the umpire, and I'm sure that Mr W has fine-tuned the conditions of the engagement so that the end result when run next will be neither the sure thing the Austrians found it to be nor the devastating victory the Prussians historically had, but something much closer to a knife-edge battle, where the players will be able to determine the outcome through their skill (and the luck of the dice).

Although Bruce protested that the game boards were still unfinished, I found them to quite live up to the high standards set by all his amazing creations of the past. Here are some photos I took during the game.

Here it's all over for Austria as the Prussians sweep through.
His work is so admired that many wargamers have posted photos of it on the Web. There's a page here with some photos giving you an idea how amazing his terrain boards are in closeup and also linking to a PDF of an article on how he builds his boards.
Roundwood's World provides here (at the bottom of the post) some photos of Bruce's Rossbrunn game presented at Colours in the UK in 2013. Here are more photos I took at a game at Cold Wars in 2012; I think it was the 1866 battle of Burkersdorf. And Operation: Wargaming posted some pictures here of a winter Franco-Prussian scenario put on by Bruce at last year's Historicon.

Most amazing of all, though, is to think that (after finishing them to his satisfaction), Mr Weigle packed them all up and is winging his way across the Atlantic even as I write to put on this game in Germany! Safe travels, Mr W, to you and your troops and tables!

Wednesday, February 17, 2016

Inter Ludus: Games Between Games

While I and the 1777 elves are gearing up for the Philadelphia campaign, I've been enjoying other game-type activity.

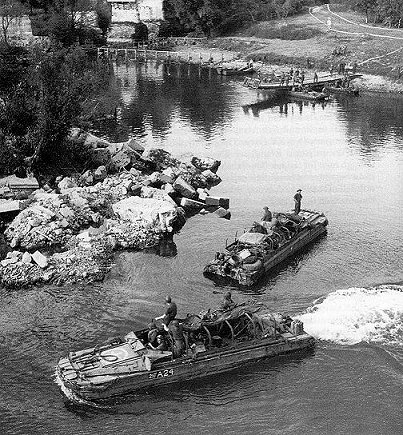
DUKWs at Veronnet (Worcestershire Regt.)
Last weekend I had the pleasure of finally sitting down to a game of ASL (two, as it turned out) with a chap Victory Comics in Falls Church, a location new to me that features a large space (including a good many gaming tables), a huge comics selection, and a nice range of boardgames. We played a scenario from a new module that's being playtested for Bounding Fire Productions, a Historical Advanced Squad Leader (HASL) treatment of Operation Neptune. No, not the D-Day landings, but the 43rd Wessex Division's opposed crossing of the Seine River in August 1944. This scenario features an infantry company attempting to cross the Seine in boats with covering fire from tanks and machine-guns. You'll have to wait for the module for details, but suffice to say this scenario will be a nail-biter with some toys to please all types.
I've been corresponding with for many years. We played at

Liberty or Death (GMT Games)
Tonight I'm hoping to inveigle one of my chums into trying out GMT Games' new American Revolution game Liberty or Death. It's an application of the highly popular COIN (counterinsurgency) game system (devised by designer Volko Ruhnke) to the political-military conflict between Britain and her American colonies. Like most COIN designs, it's a four-player game that can be played solitaire or with fewer than four players either by players controlling two aligned (but competing) factions or by the use of well designed paper-based artificial intelligence players. The third and fourth positions in this conflict are allotted to the Native American nations (as allies of the British) and to France (as an ally of the Americans), both of which have their own agendas and their own victory conditions different to those of their allies. Combine a successful basic system, designer knowledgeable in his topic and skillful at adapting the system to purpose, and gorgeous artwork, and you've got what I anticipate to be an excellent game. I've been reading progress reports on this title for some time, and I'm quite chuffed to be able to finally put it on the table.

1866 (Mediaeval Miscellanea)
And this weekend I'll have the pleasure of helping to playtest a scenario for the highly enjoyable 1866 rules from Bruce Weigle. This will be his full-bore treatment of the crucial battle of Königgrätz (aka Sadowa) from the Austro-Prussian War of 1866. I recently got hold of a copy of Avalanche Games' Battles of 1866: Frontier Battles, which includes several engagements from this war but not the conclusive engagement itself (they keep promising to release it as an add-on, but it seems that time has passed that idea by). But I've played one or two battles from this curious war before using Bruce's rules, and I'm looking forward to the mammoth encounter. The 1866 rulebook has Koniggratz among its scenarios, but done as two different engagements. This will be a huge game covering the entire battle.

Reading up on it, I'm guessing that the Austrian may have a chance to overcome their deficiencies of tactics and technology (better-ranged weapons, but slower-firing ones) as the battle kicks off with the Austrians outnumbering the Prussians. They had better take advantage of the opening, however, as the arrival of the Prussian Second Army under Crown Prince Friedrich (son in law of Britain's Queen Victoria and father of the future "Kaiser Bill", Wilhelm II) will seal the Austrian's fate, as it will complete their encirclement and push the odds strongly in the Prussians' favour. We shall see!